Table of Contents
WooCommerce is one of the best ways to set up an e-commerce business. If you are already using it, it’s great. And if you are about to start your e-commerce business, we suggest you consider it your platform. WordPress website owners can get started with WooCommerce by installing a plugin and setting up a few more things.
Now that it comes with the inherited simplicity of WordPress, you won’t ever find it difficult to use WooCommerce. However, you may need some more plugins to build a better online store that could align well with your business model. For example – you might want to give a 10% discount to the buyers purchasing books or a discount of $5 for cakes.
How will you do that? You will need a plugin!
Adding a category-based discount can help you promote specific products, as was needed in the above scenario. WooCommerce Conditional Discount Rules for Checkout Plugin comes in handy here. Though this plugin has multiple capabilities, in this post, we will brief you on how to add category-based discounts in WooCommerce only.
Installing the Plugin
We are considering that you’ve already set up WordPress and WooCommerce, and now, you want to give category-based discounts to your existing and new customers. So, the first step towards this is downloading and installing a plugin that could make it happen. Visit the link and download the plugin, henceforth.
WooCommerce Dynamic Pricing and Discount
Apply advanced discount conditions to drive more revenue with our intuitive and easy-to-use plugin.
14-day, no-questions-asked money-back guarantee.
Once it is downloaded, go to your WordPress dashboard, navigate to Plugins, and select ‘Add New Plugin’. Upload the zipped plugin that you downloaded previously. Finally, click on Install and enable it once the installation is completed.
How to Add Category-Based Discounts in WooCommerce?
Step – 1
As you have successfully installed our suggested plugin on your WooCommerce store, it must be visible in the left sidebar of your store’s WordPress admin dashboard by now.
Click on the name of WooCommerce Conditional Discount Rules for Checkout Pro Plugin and see the top menu bar inside the plugin dashboard (the one enclosed in the WordPress dashboard). Now, click on the ‘Add New’ button to add new discount rule.
Step – 2
Now, you must be able to see a new page with 2 sections, namely – Fee Configuration Form and Dynamic Discount Rules. The former section is all about the basic details of the discount rule, while the latter is about the conditions for which this rule will be applied.
Start with filling out the fee configuration form, which must match the depiction added below –
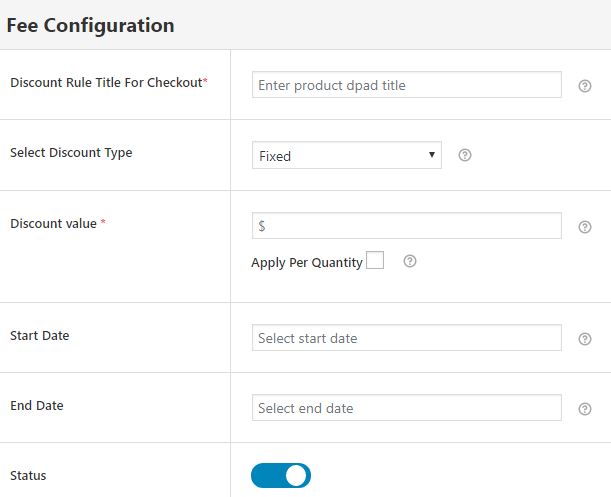
Here, the first field in the form – Discount Rule Title for Checkout – is for the naming of your rule. Add a meaningful phrase in this essential field as it will be visible to your customers too. This form field cannot be left blank.
Now, there are 2 options – Fixed and Variable – to choose from when it comes to the discount type.

If you want to apply a fixed-rate discount, such as $2, $10, etc., choose the discount type as fixed.
Select the variable as your discount type for product-based fractional discounts, such as 10% or 7% of the product cost.
Next, you need to determine the value of the discount. If you want the discount to be applied to every item separately, just fill in the discount value. The plugin will take this value as a money amount if you’ve selected the fixed discount type and as a percentile value if you’ve chosen the variable discount type.
Conversely, if you are willing to reduce the discount for bulk purchases, consider another way. Tick on the ‘Apply per Quantity’ checkbox, and you will see a few more options appearing in front of you.

First, understand when it is required to use this option.
Let’s say a person has purchased 10 t-shirts, and you’ve given a 10% discount on them, with the price being $30 per t-shirt.
If not tick the ‘Apply per quantity’ and fill in the following form fields, your buyer will get a discount of $30 on the purchase.
On the other hand, if you have ticked the ‘Apply per Quantity’ checkbox, a 10% discount will be applied to the first item of the product. You will get a different discount on the next item of the same product type. You can fill in the field ‘Fee per additional Quantity’ to specify this discount. So, if you have filled 1 here, the buyer will get a 1% discount on the 9 t-shirts and a 10% discount on 1 t-shirt. In this case, the overall discount will be $5.7 (i.e., $3 + $0.3*9).
In the end, add the start and end dates to define the duration for which this method should work. Leave it blank if you want it to run for an indefinite duration.
Whenever you want to disable this method temporarily, choose the status as disabled. You can always enable it later.
Step – 3
Now is the time to add the category-based rule(s) to the Dynamic Discount Rule section.
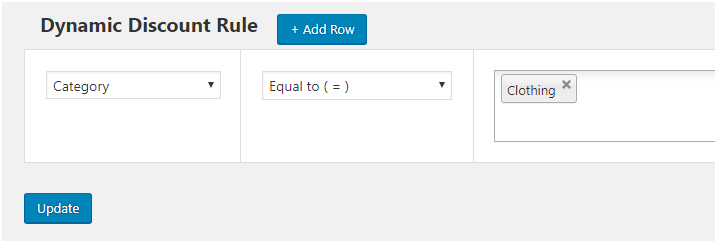
In the above example, we selected 1 category for applying the discount rule. However, using this plugin, you can apply category-based discounts to multiple categories at once too. For example – We can apply the discount rule for clothing, music and décor categories –

Not only can you apply a discount on one or multiple categories, but you can exclude any category (or multiple categories) from the discount. For this, you will have to choose the ‘Not Equal to (!=)’ option from the drop-down added in the middle. Here is one example –

It is also possible for the sellers to add more rules alongside the category-based (or categories-based) rules to your discount method.
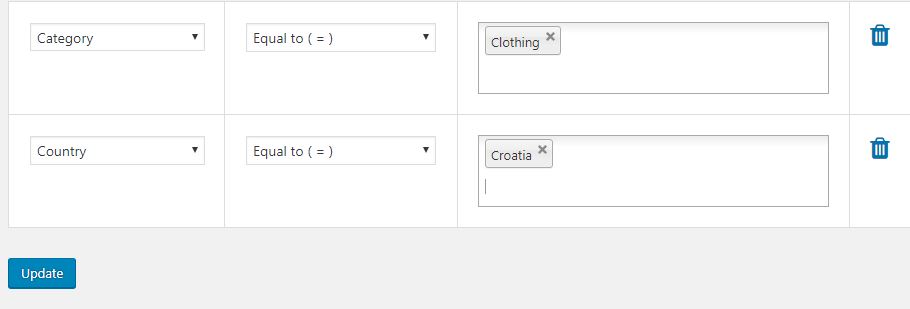
For example, if you want to apply the discount added in the fee configuration for, to the clothing category when a buyer purchases from the Croatian country, you will need to add 2 rules to this section. One will be a category-based rule, stating category Equals to (=) Clothing, while another will be a country-based rule, stating that the Country is Equal to (=) Croatia.
The final arrangement of the Dynamic Discount Rules section for this scenario will look something like this –
Keep in mind that you can add as many rules to a method as you want, depending on your store’s needs. These rules can be based on country, state, postcode, custom zone, product, variable product, category, SKU, tag, user, user role, cart subtotal, shipping class, weight, and quantity alongside category.
Overall, the WooCommerce Conditional Discount Rules for Checkout Plugin is a complete discounting solution for your e-commerce store. It can be used to give a discount on multiple occasions, such as Christmas, Black Friday, brand-specific special days, and more, to gain the attention of buyers and sell more. This plugin allows you to customize discounts and create advanced discount rules for your online shop.
WooCommerce Dynamic Pricing and Discount
Apply advanced discount conditions to drive more revenue with our intuitive and easy-to-use plugin.
14-day, no-questions-asked money-back guarantee.

