Table of Contents
Sometimes, you may need to charge additional fees for some orders without changing the base product price for other orders. In this tutorial, I’ll show you how to add a custom fee in WooCommerce in ten minutes or less — no coding required.
Do you want to add a custom fee in WooCommerce?
Many stores often need to charge extra fees to cover additional costs or value-added services. And while there’s no native WooCommerce setting to add custom fees, you can easily set it up with the help of a plugin.
In this post, I’ll show you how to add a custom fee in WooCommerce using two powerful plugins:
- WooCommerce Extra Fees: The best plugin to charge various kinds of custom fees, such as rush processing fees, security deposits, handling fees, customs duties, shipping fees, etc.
- Flat Rate Shipping for WooCommerce: The best custom fee plugin to charge custom shipping-related fees and completely customize your store’s shipping settings.crypto
First things first, let’s dig a bit deeper into why you might want to charge custom fees in WooCommerce.
Why charge a custom fee in WooCommerce?
Setting custom fees in WooCommerce instead of bundling expenses into product and service costs can be beneficial for both your customers and bottom line. Here are the top reasons why it’s often the smarter approach:
- It helps you comply with tax policies: Some regions treat certain fees differently for tax purposes. For example, environmental fees or recycling charges might be taxed differently than product sales. Charging specific custom fees at the point of sale makes sure that the tax calculations for each order are accurate.
- It lets you share prices transparently: Customers appreciate transparency, and separating additional fees from the base product price provides clarity. When you clearly list additional costs — like handling fees or special packaging — shoppers understand exactly what they’re paying for. If, for example, you sell fragile items that require extra care like glassware, a clearly stated $5 handling fee builds trust because it shows that the additional charge is because of the complex packaging, rather than an arbitrary price increase.
- It makes adapting to changing costs easier: If your material costs, labor expenses, and shipping rates fluctuate frequently, adding custom fees for orders that match specific criteria allows you to dynamically adjust costs based on the specifics of each order. Instead of overpricing products to cover every possible scenario, you can charge extra only when certain conditions are met. For example, you can add a fee for deliveries to remote areas without changing the base price for customers in other standard shipping zones. This makes sure that you remain competitive while still covering all product and service costs as needed.
- It enables you to capture various market segments: Keeping product prices competitively low while offering add-on services via custom fees lets you cater to various kinds of customers. For example, if your WooCommerce store sells flowers, you can add an optional rush order fee or a gift-wrapping service as an upsell. Customers who want these services will choose to pay the extra cost, while those who don’t can proceed without feeling like they are paying for features they don’t need.
- It helps protect your margins: If you sell lots of items with low margins, charging custom fees allows you to recover specific costs without inflating the base price (which can drive customers away). A common example of this is stores that add a 2% processing fee for credit card payments via specific gateways to avoid having to absorb transaction costs.
Why use plugins to add WooCommerce custom fees
WooCommerce, by default, does not provide any specific way of doing so. So, you will have to use some add-on for making this feature work.
Now, there are two ways of doing this.
First, you can add custom code by developing a custom plugin for your e-commerce store and install it. Second, you can search for an already-developed plugin and utilize it for your online business.
We would suggest you go with the second alternative because most of the plugins are maintained by their developers. They keep adding new capabilities to these plugins while maintaining their compatibility with the latest versions of WordPress.
On the other hand, maintaining a custom-developed plugin will be costly and impractical.
Also, these plugins are used by multiple online shop owners like you, hence their credibility is verifiable. If you pick a feature-rich plugin which has multiple required efficiencies related to adding custom fees, your work will become easy too.
In the next section, I am going to tell you about how many types of custom fees can you add to your WooCommerce store, which plugins will work perfectly for your stores’ needs and how to use those plugins to add custom fees to an online store.
Type of custom fees in WooCommerce
There are two types of custom fee, you add to your online store –
1. Fixed custom fees
Fixed fees are fees which could be applied to your eCommerce store when a customer makes a purchase. It can be applied on the whole cart or for shipping charges or for a particular product/category/set as per your setup.
Business owners generally want to charge an extra price for delivery services, customization, gift wrapping, payment gateway, storage or something similar. If you need a method to do the same you will be charging flat rates, e.g. $2, $5, $60, etc. You should look for a plugin which allows charging fixed fees.
The best plugins to charge fixed custom fee
I. Advanced Flat Rate Shipping Method for WooCommerce
This plugin is shipping-specific. It allows the eCommerce store owners to charge flat rate fees on shipping. You can set different but fixed rates for different conditions related to shipping while using this plugin.
Here’s what you can do using this plugin –
- Apply fixed shipping fee according to the product weight, quantity, price, cart total, category, etc. using this plugin without any difficulties.
- With it, you can enable free shipping too.
- Multiple flat rate shipping fees can also be charged on a transaction.
- You can allow buyers to select a fee out of many or apply one according to set priority rules in case of conflict.
Note: Wait till the ‘How to’ section to learn about the working of the plugins mentioned here.
II. WooCommerce Conditional Product Fees for Checkout
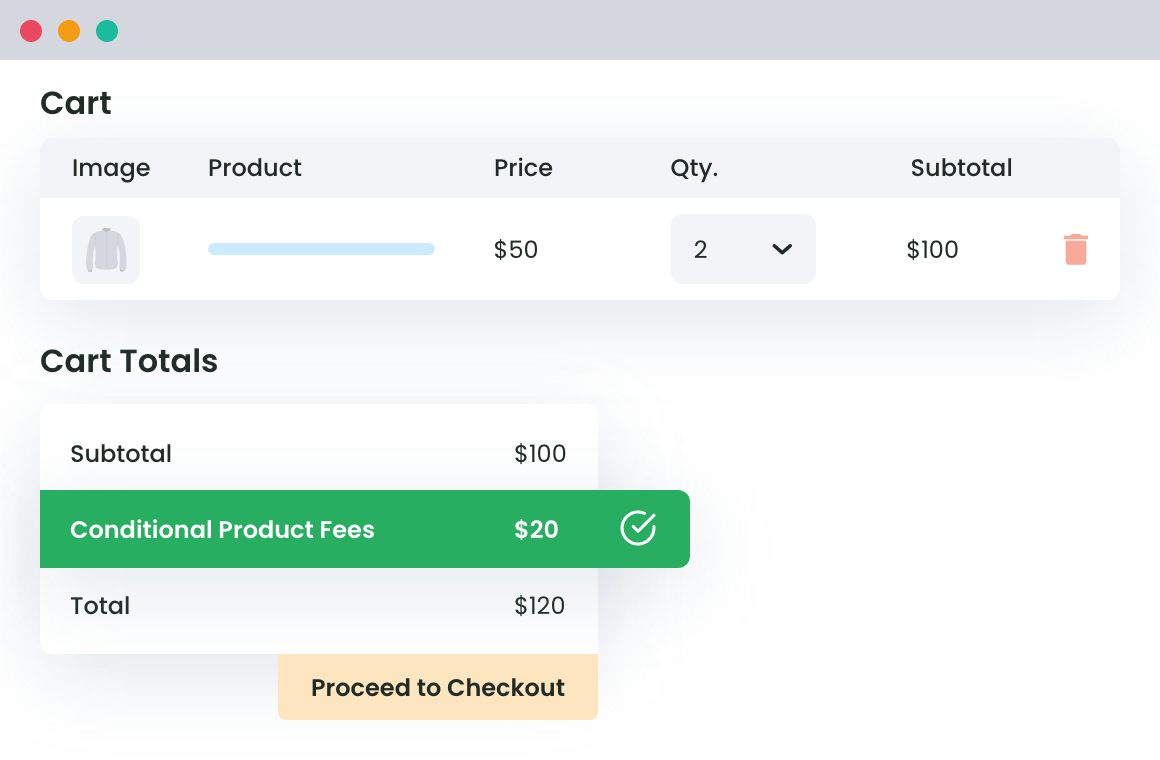
Unlike the first plugin, WooCommerce Conditional Product Fees for Checkout plugin works on the cart total or product. It lets you add an extra fee on the cart. You may use this feature for charging additional money to compensate for product add-ons, credit card commissions, urgent delivery services, gift wrapping services, outbound transfer service, etc.
Again, the value of fee should be in fixed numbers, e.g. $40, $15, etc.
2. Variable custom fees
For charging a fee as per the cost of product or cart total, you will have to add Variable custom fees in the WooCommerce store. For example, in case you are willing to charge 3% of cart total extra from your customer as Payment Gateway fee, a plugin with Variable fee charging capabilities will let you do this.
The best plugin to charge variable custom Fee
WooCommerce Extra Fees is the best plugin for this purpose. It is the same plugin as we used for charging a fixed fee on cart or products. You can charge both types of extra fee using it.
WooCommerce Extra Fees
Make profits from every confirmed sale through smart, conditional fees.
14-day, no-questions-asked money-back guarantee.
How to add custom fees in WooCommerce
In this section, I’ll discuss two methods to add custom fees to your WooCommerce store using the WooCommerce Extra Fees and Flat Rate Shipping for WooCommerce for WooCommerce plugins.
Visual learner? Check out the video walkthrough that shows the steps to add custom fees in WooCommerce. Otherwise, continue reading for written instructions.

Let’s get started.
Method 1: Adding custom fees with the WooCommerce Extra Fees plugin
The WooCommerce Extra Fees plugin is perfect for situations where you need to add order processing fees, handling fees, customs duties, security deposits, etc. You can also use it to charge custom shipping and handling fees. For this tutorial, I’ll use it to add a rush processing fee for all orders.
Follow these steps to add custom fees using the WooCommerce Extra Fees plugin.
- Get WooCommerce Extra Fees and add it to your website.
- Once it’s activated, navigate to Dotstore Plugins > WooCommerce Extra Fees > Manage Fees > Add New.
- As mentioned, I’m adding a rush processing fee for all orders. So, I’ve named it accordingly in the “Fee title” field. Note that this is visible on the front end.
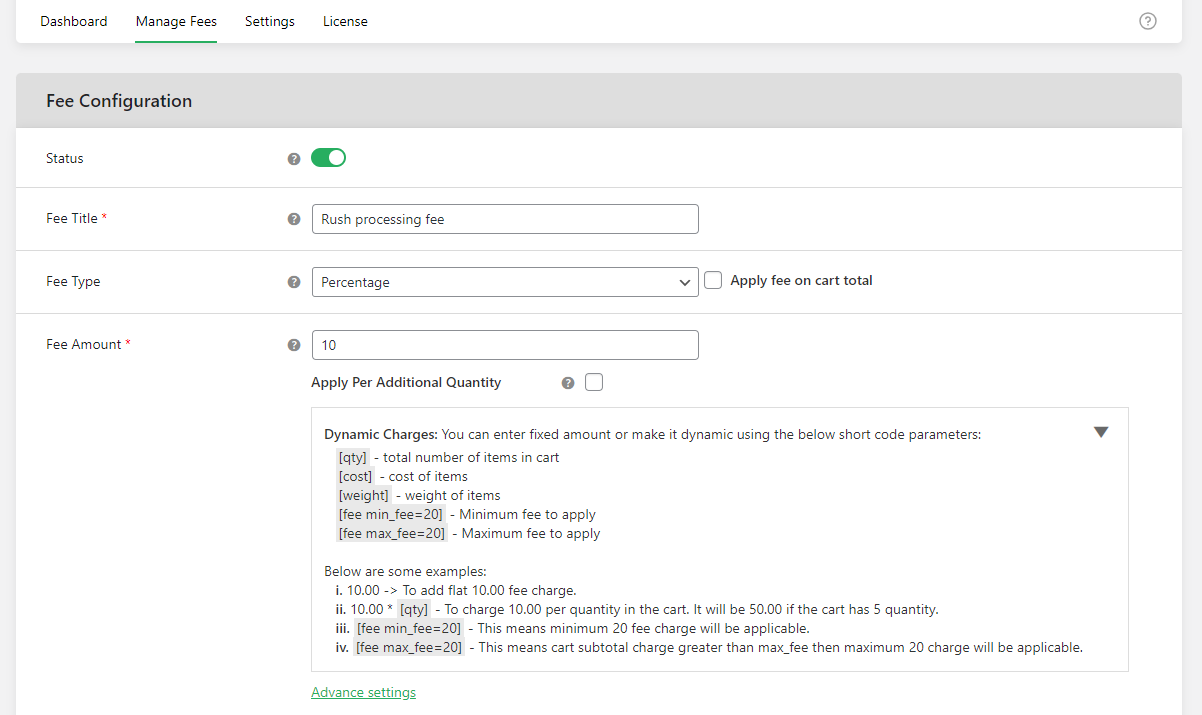
- Next, select the type of fee, whether fixed percentage, fixed rate, or a combination of percentage and fixed fee. To keep things simple, I’ve selected “Percentage” here.
- Then enter the appropriate fee amount. If you like, you can also add extra rules and criteria to apply the charge per additional product quantity.
- Specify whether this custom processing fee is taxable or tax-exempt.
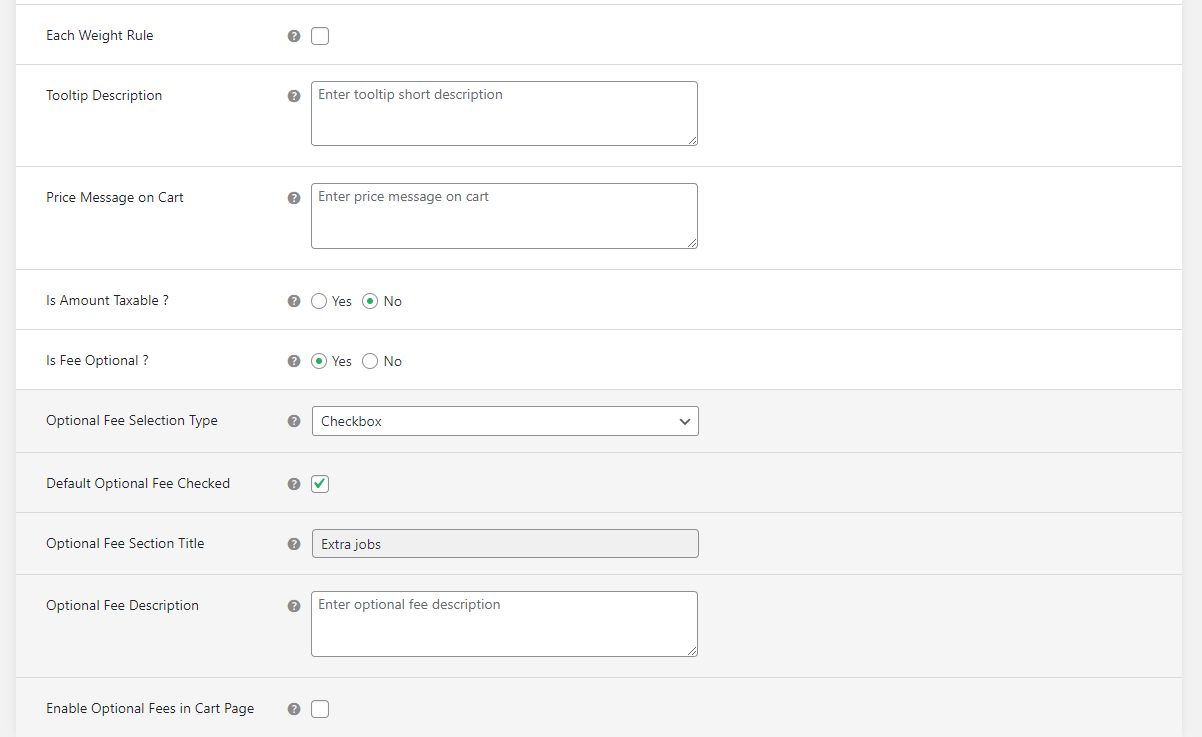
- Next, denote whether the custom fee is optional or whether you want it to be applied to all orders.
- If you opted to make the fee optional in the previous step, you’ll get a set of additional options relating to how it is presented on the front end, whether it is auto-selected by default, the title and description copy that describes what the fee is to customers, and more.
- The “Conditional Fee Rule” section lets you add criteria to finetune how the custom fee is applied. There are tons of parameters to choose from: location, product-specific, user-specific, purchase history, etc. Choose the desired parameters and configure them as needed.

- You can toggle on the “Advanced Fees Price Rules” to add even more criteria to control how the custom fees are applied to each order. You can add advanced rules based on specific products, product subtotal, product quantity, etc.
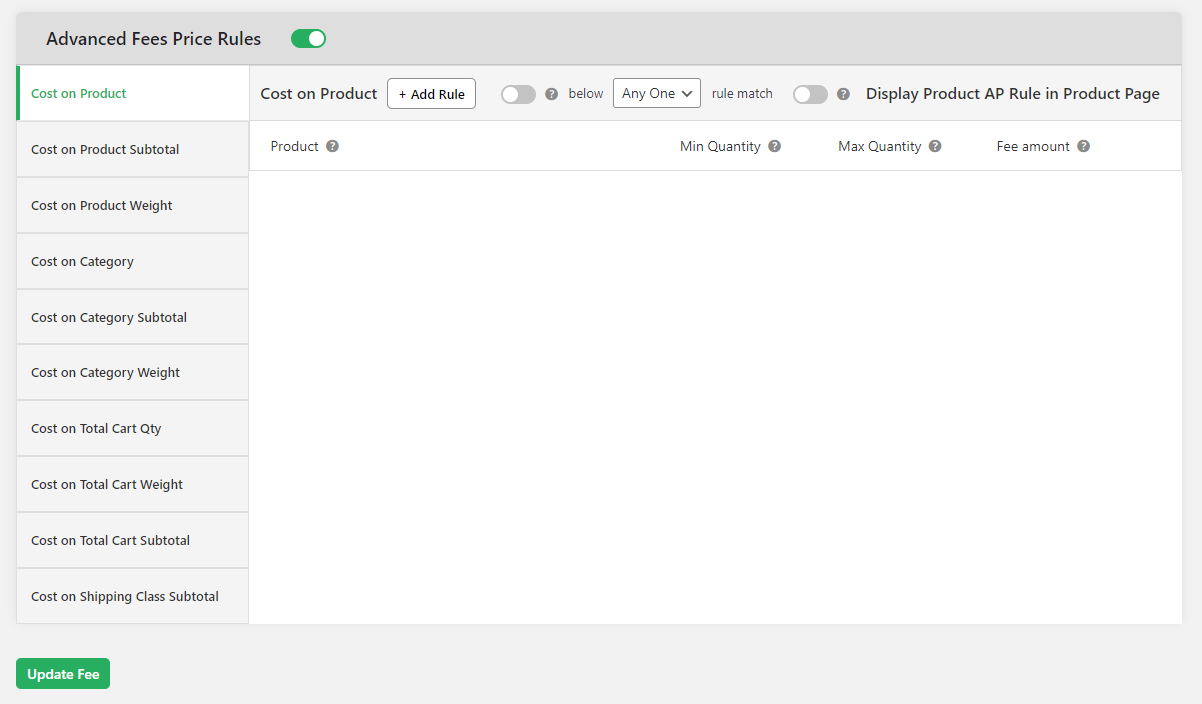
- Once done, hit “Save Fee” at the bottom of the page.
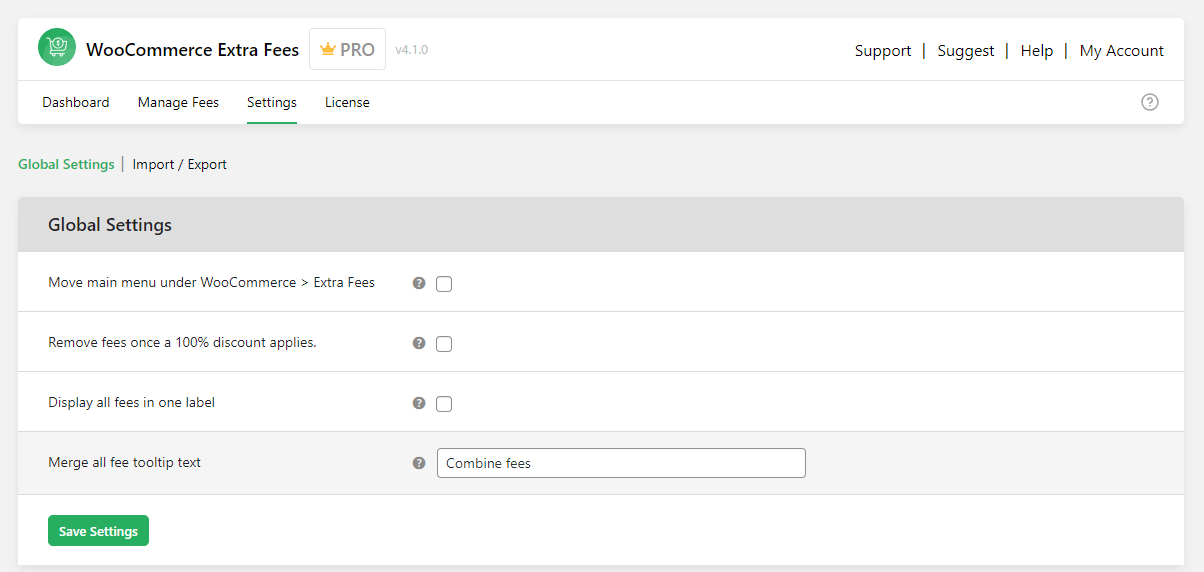
- To add storewide settings, navigate to Dotstore Plugins > WooCommerce Extra Fees > Settings > Global settings. From here, you can choose whether or not to move the main menu, prevent custom fees from being applied to orders that have been 100% discounted, and lump all fees in a single section.
Method 2: Adding custom fees with the Flat Rate Shipping for WooCommerce plugin
The Flat Rate Shipping for WooCommerce plugin lets you customize shipping settings and tailor shipping fees as needed. It is perfect for stores that want to set up granular shipping controls.
Follow these steps to add custom shipping fees using the Flat Rate Shipping for WooCommerce plugin.
- Get Flat Rate Shipping for WooCommerce and add it to your website.
- Once it’s activated, navigate to Dotstore Plugins > Flat Rate Shipping > Settings.
- From here, you can update a lot of storewide settings, including:
- Add, modify, delete, import, and export shipping zones.
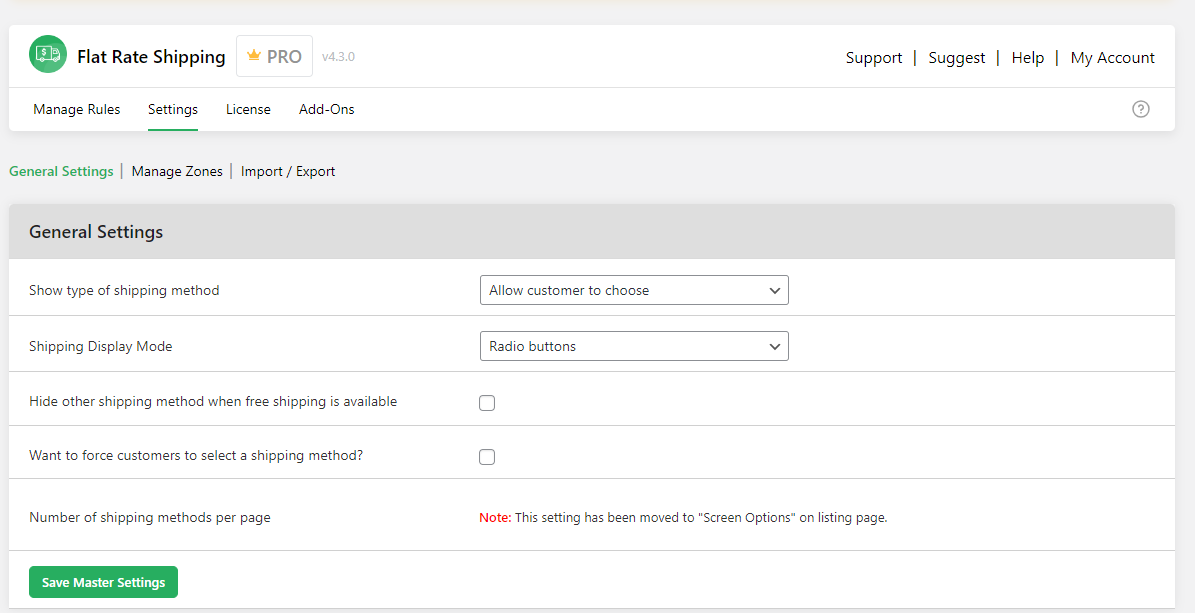
- Select the default type of shipping method to be shown on the cart and checkout pages.
- Decide whether to show shipping options in radio buttons or dropdowns.
- Decide whether or not to hide other shipping methods when free shipping is available.
- Decide whether or not to force customers to select a specific shipping option.
- Add, modify, delete, import, and export shipping zones.
- Once you’ve configured the storewide settings, it’s time to add specific custom shipping fees. Navigate to Dotstore Plugins > Flat Rate Shipping > Manage Rules > Add New.
- Make sure the status is toggled on.
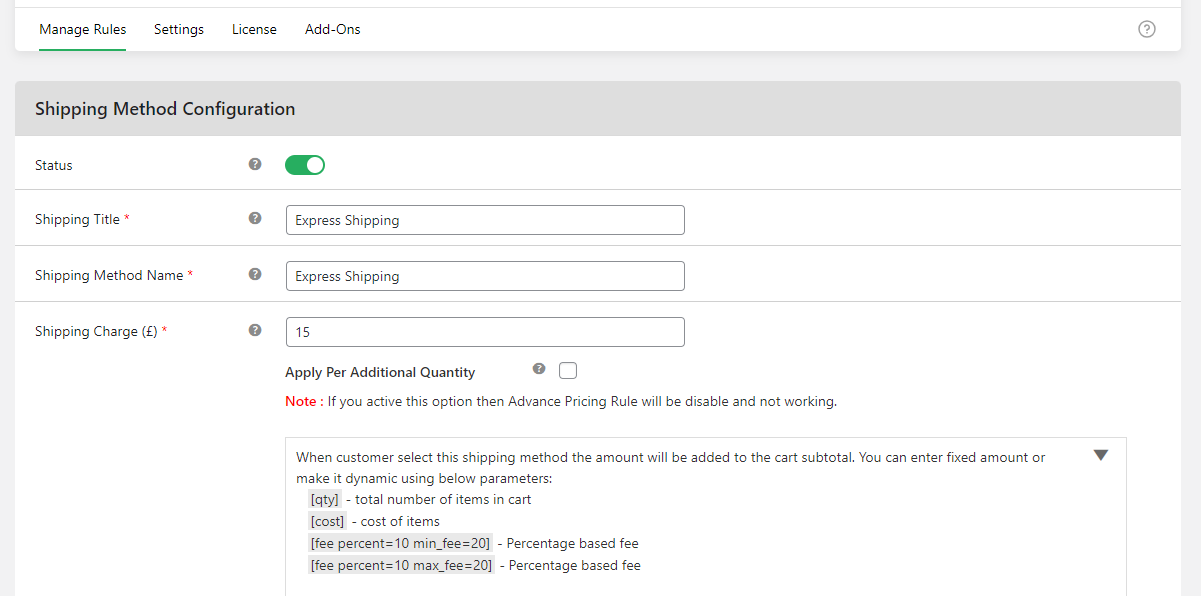
- Next, update the “Shipping Title” (for admin view only) and “Shipping Method Name” (for customers’ view) fields.
- Enter the custom shipping fee amount in the “Shipping Charge” field and denote whether it should be applied per additional quantity.
- If you wish to further finetune how the custom shipping fee is applied based on product quantity and product weight, update the details in the “Each Weight Rule” and “Each qty rule” sections.
- Next, denote whether this custom shipping method should be the default shipping option.
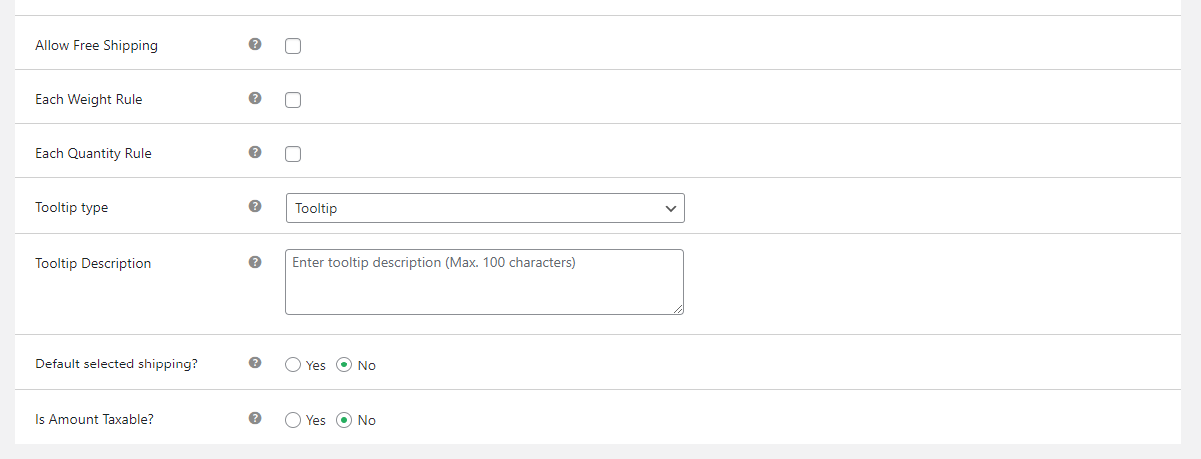
- Specify whether this fee is taxable or tax-exempt.
- The “Additional Shipping Charges Based on Shipping Class” section lets you add fees for custom shipping classes: bulky, lightweight, poster pack, etc. Plus you can choose the logic for how the fee is applied.
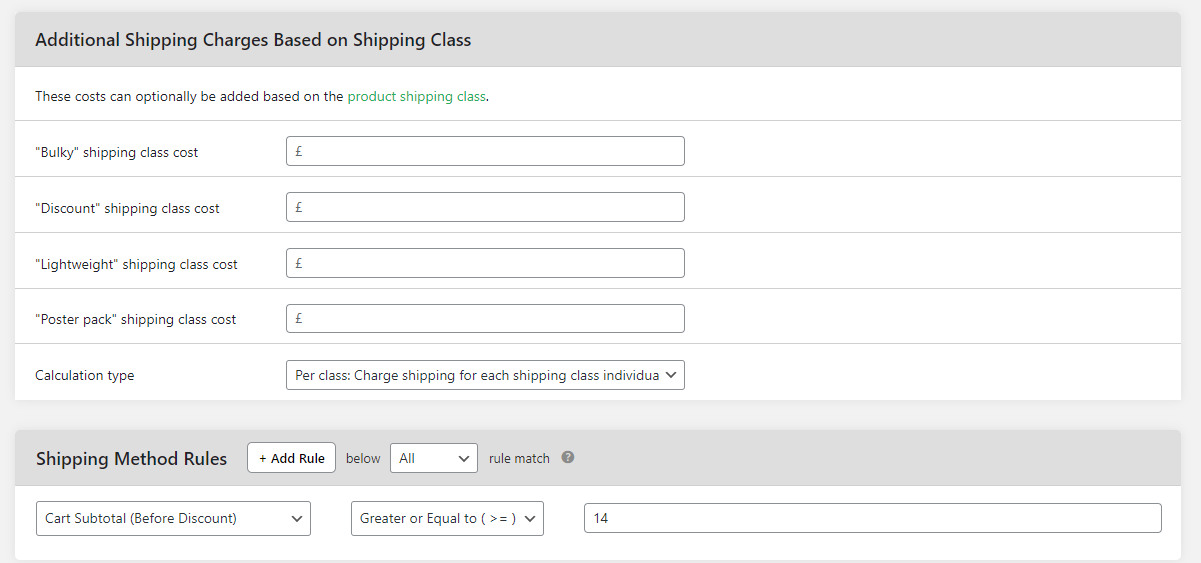
- The “Shipping Method Rules” section lets you add granular rules based on a wide variety of parameters: location, users, products, etc. Add the appropriate rules for this custom fee.
- Toggle on the “Advanced Shipping Price Rules” button if you’d like to further finetune custom shipping fees based on product cost, total cart quantity, cart weight, etc.

- Once you’ve added all desired criteria, hit “Save” at the bottom of the page.
Save the settings and exit. Your method should work as per the conditional rules you have saved.
In case you face difficulty in following our instructions, drop a comment and we’ll try helping you out.
If you need any assistance with Custom WooCommerce Development, feel free to reach-out Multidots. They are one of the WordPress VIP partners and parent company of DotStore.
Advanced Flat Rate Shipping Methods
Boost your WooCommerce store’s revenue with flexible shipping options. Your business deserves the best!
14-day, no-questions-asked money-back guarantee.
FAQs about adding custom fees in WooCommerce
In this section, I’ll answer some popular questions about charging custom fees in WooCommerce.
What is the best WooCommerce custom fee plugin?
The best WooCommerce plugins to charge custom fees are WooCommerce Extra Fees and Flat Rate Shipping for WooCommerce by The Dotstore plugins.
WooCommerce Extra Fees lets you charge various types of custom fees, including handling fees, customs duties, shipping fees, order processing fees, security deposits, etc. Flat Rate Shipping for WooCommerce lets you charge custom shipping-related fees and gives you additional control over your store’s shipping settings.
Common WooCommerce custom fee examples
Here are some popular examples of why Woo stores may need to charge custom fees.
- To cover additional costs: Custom fees can help recover specific costs that aren’t covered in product prices. Think: packaging, handling, or special shipping requirements. For instance, a store that sells fragile easy-to-damage items like glassware or flowers can add a handling fee to cover the costs of extra protective materials.
- To charge for value-added services: You can charge custom fees for extra, value-added services. Think: gift wrapping, express handling, or product assembly. Adding the charges for these services as optional fees gives shoppers the flexibility to choose while helping your business offset the cost of providing these premium services.
- To better comply with local regulations: In some regions, ecommerce stores may need to include specific fees due to local regulations. Think: eco fees, recycling fees, bottle deposits, etc. For example, in some EU countries with stringent e-waste recycling regulations, stores that sell electronics typically add an e-waste recycling fee to help manage disposal costs and remain compliant.
- To boost margins for low-margin products: Adding small custom fees can improve profit margins, especially when selling low-margin products. For example, a processing fee for cash on delivery orders can offset the extra administrative cost and risk associated with non-prepaid transactions.
- To encourage certain payment methods: Some payment gateways and methods charge higher transaction and usage fees than others. Charging extra fees is a great way to nudge customers to use specific payment providers or methods. For instance, adding a fee for crypto payments can nudge customers to pay with debit or credit cards.
- To charge minimum order fees: Adding a small flat or a percentage-based fee for purchases that fall below a certain threshold helps make sure low-value orders are profitable. It nudges shoppers to increase their cart totals and make sure that you don’t receive too many small orders which can become a burden to your bottom line.
- To handle special shipping requirements: A custom fee makes sense for situations where a customer needs rush shipping or same-day delivery. It enables store owners to accommodate the rushed request without absorbing the extra expense. This type of fee also helps keep standard shipping costs competitive while still offering flexibility to those willing to pay for speed.
How do I add processing fees in WooCommerce?
Follow these steps to add custom processing fees to your WooCommerce store.
- Get the WooCommerce Extra Fees plugin and install it on your site.
- The first step is to configure the storewide settings. Navigate to Dotstore Plugins > WooCommerce Extra Fees > Settings > Global settings. From here, you can choose whether or not to move the main menu, prevent custom fees from being applied to orders that have been 100% discounted, and lump all fees in a single section.
- Next, navigate to Dotstore Plugins > WooCommerce Extra Fees > Manage Fees > Add New.
- Add the name for the processing fee in the “Fee title” field. Note that customers can see this on the front end.
- Select the type of processing fee: fixed rate, fixed percentage, or both percentage and fixed rate.
- Enter the appropriate processing fee amount. Optionally, you can add extra rules and criteria to apply the charge per additional product quantity.
- Specify whether this custom processing fee is taxable or tax-exempt.
- Next, denote whether the processing fee is optional or whether you want it to be applied to all orders.
- If you opted to make the processing fee optional in the previous step, you’ll get a set of additional options relating to how it is presented on the front end, whether it is auto-selected by default, the title and description copy that describes what the fee is to customers, and more.
- The “Conditional Fee Rule” section lets you add criteria to finetune how the custom fee is applied. There are tons of parameters to choose from: location, product-specific, user-specific, purchase history, etc. Choose the desired parameters and configure them as needed.
- You can toggle on the “Advanced Fees Price Rules” to add even more criteria to control how the custom fees are applied to each order. You can add advanced rules based on specific products, product subtotal, product quantity, etc.
- Finally, hit “Save Fee” at the bottom of the screen.
That’s how to add a custom fee in WooCommerce!
In this post, I’ve shown you step-by-step how to add custom charges to account for shipping, handling, rush processing, and other types of extra costs.
Since there’s no default method to add a custom fee in WooCommerce, you’ll need to set this up using either of the two plugins:
- WooCommerce Extra Fees: The best plugin to charge rush processing fees, security deposits, handling fees, customs duties, shipping fees, and various kinds of custom fees.
- Flat Rate Shipping for WooCommerce: The best custom fee plugin to charge custom shipping-related fees and completely customize your store’s shipping settings.
Get started with these plugins and start charging custom fees in WooCommerce in ten minutes or less!
