Table of Contents
Did you know that the online shopping cart abandonment rate is as high as 70% in 2024?
This can be caused by a multitude of reasons including lengthy checkout processes, unexpected extra costs, absence of guest checkout facility, or concerns about payment security. For WooCommerce users, the issue is often amplified by the fact that the built-in checkout is basic and not optimized for sales.
The checkout page is a critical point in the customer journey, where customers either complete or abandon their purchase. A smooth, seamless checkout experience is crucial not just for reducing cart abandonment but also for enhancing overall customer satisfaction.
In this article, we’ll walk you through top methods and actionable steps to help customize and enhance your WooCommerce checkout page. We’ll also cover plugins and tools that streamline the process, including checkout optimization and design using Dotstore plugins.
1. Streamline Fields and Minimize Customer Input
22% of customers in the United States abandoned their orders in 2024 because the checkout process was too long or complex. Especially for digital products, unnecessary fields like billing and shipping addresses can slow down the checkout, frustrating customers and leading to lost sales.
Here are some actionable tips to make sure that this does not happen to your site customers:
Implement Address Auto-Fill: Set up browser autofill for your checkout fields to reduce manual input and errors. To make this work smoothly, ensure your WooCommerce checkout fields stick to standard naming conventions. The default setup in WooCommerce usually does this well, but any customizations or theme tweaks might disrupt it.
Identify and remove unnecessary fields: Take a close look at your checkout form and get rid of fields that aren’t necessary, especially if you’re selling digital products. Through WooCommerce’s Customizer (Appearance > Customize > WooCommerce > Checkout), you can hide fields like company name, the second address line, and phone number.
Remove additional checkout fields by adding custom code to your theme’s functions.php file. To ensure your changes stay intact after theme updates, it’s best to use a child theme.
Using a field editor plugin like WooCommerce Checkout for Digital Goods or Checkout Field Editor plugin can easily streamline fields by allowing customization and exclusion of non-essential information. Checkout Field Editor will also enable you to add up to 20 types of custom checkout fields, to suit any kind of business need.
Bypass Unnecessary Fields with Dotstore
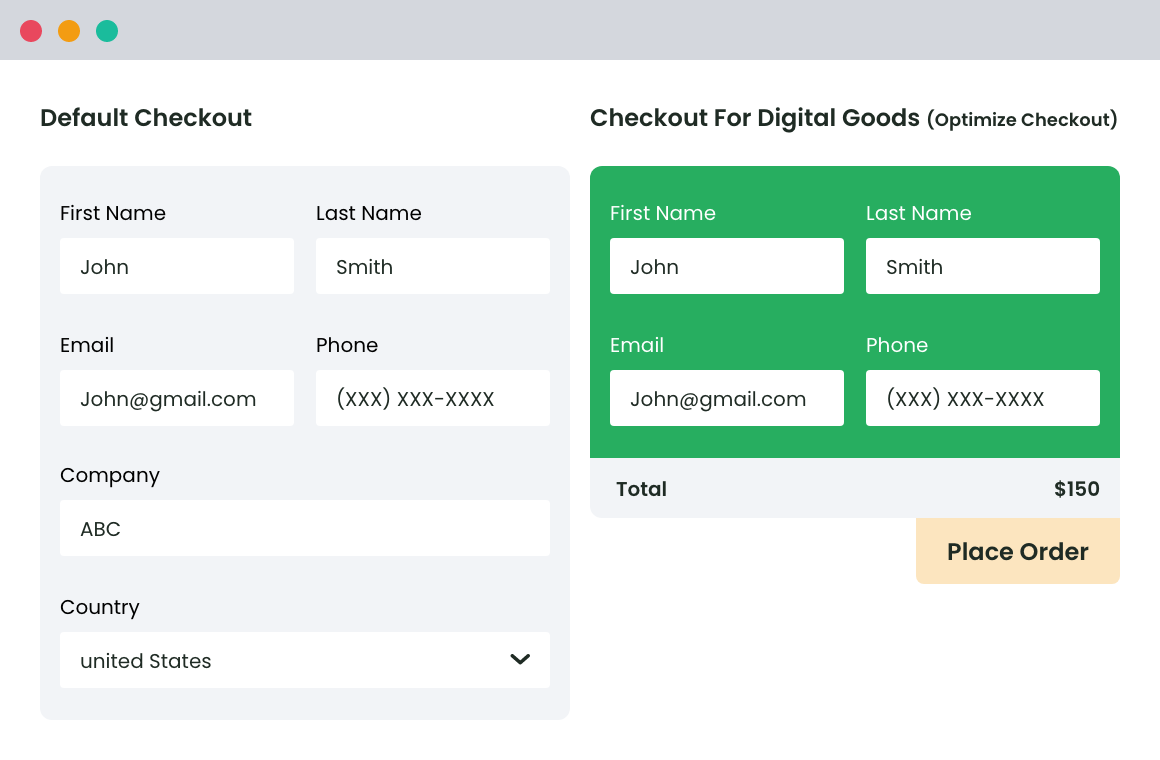
The WooCommerce Checkout for Digital Goods from Dotstore is designed to streamline your checkout process by removing unnecessary fields, making it faster and more efficient. This plugin is ideal for digital products, where fields like shipping and billing addresses aren’t needed. This allows customers to complete their purchases with minimal input.
“Simple. Works as expected. Makes it easy for my customers to check out without all the fluff. Perfect.”
Charles (@charlesrodmell), Runningversity
Step-by-Step Guide
To edit your checkout billing fields and remove any that aren’t necessary, follow these simple steps:
- Navigate to WooCommerce > Settings in your WordPress dashboard.
- Select the Checkout tab, then choose Billing Fields.
- Deselect the fields you don’t need.
- Save your changes and test the checkout process to ensure it meets your requirements.
2. Reduce the Number of Steps
Simplifying the checkout process is key to reducing cart abandonment and improving user experience. Unnecessary fields and extra steps can frustrate customers, leading to abandoned carts and lost sales.
One-Page Checkout: Simplify the process by consolidating multiple checkout steps into a single page. Utilize one-page checkout plugins such as WooCommerce One Page Checkout or Direct Checkout for WooCommerce.
For digital products, the WooCommerce Checkout for Digital Goods plugin enables one-click checkouts, streamlining the purchase process even further.
Skip the ‘Create an Account’ Stage: Enable guest checkout to allow users to make purchases without creating an account. Go to WooCommerce > Settings > Accounts and Privacy and ensure that the “Allow customers to place orders without an account” option is checked.
To collect customer information without disrupting the purchase flow, consider delaying account creation until after the transaction is complete. The WooCommerce Checkout for Digital Goods plugin offers a ‘Delayed Account Creation’ feature specifically for this.
Enable Quick Checkout with Dotstore
The WooCommerce Checkout for Digital Goods plugin from Dotstore provides a quick checkout feature that enhances convenience by allowing purchases from multiple points on your website. This streamlined approach offers a variety of benefits:
- Reduced cart abandonment rates
- Increased conversion rates
- Enhanced customer satisfaction
Step-by-Step Guide
To configure quick checkout and assign it to specific products or pages, follow these steps:
- Install and activate the WooCommerce Checkout for Digital Goods plugin.
- Navigate to General Settings > Settings in your WordPress dashboard.
- Enable the ‘Manually Quick Checkout List for Product/Category/Tag’ option under ‘Quick Checkout On’.
- Click on either the ‘Click here’ button next to the selected option or the ‘Quick Checkout’ link at the top to access the Quick Checkout Page.
- Add items under the ‘Products,’ ‘Categories,’ or ‘Tags’ sections by using the ‘Add New’ option. Save your settings in the General Settings tab.
- Verify that the quick checkout option is active on the shop and/or product pages for the selected items.
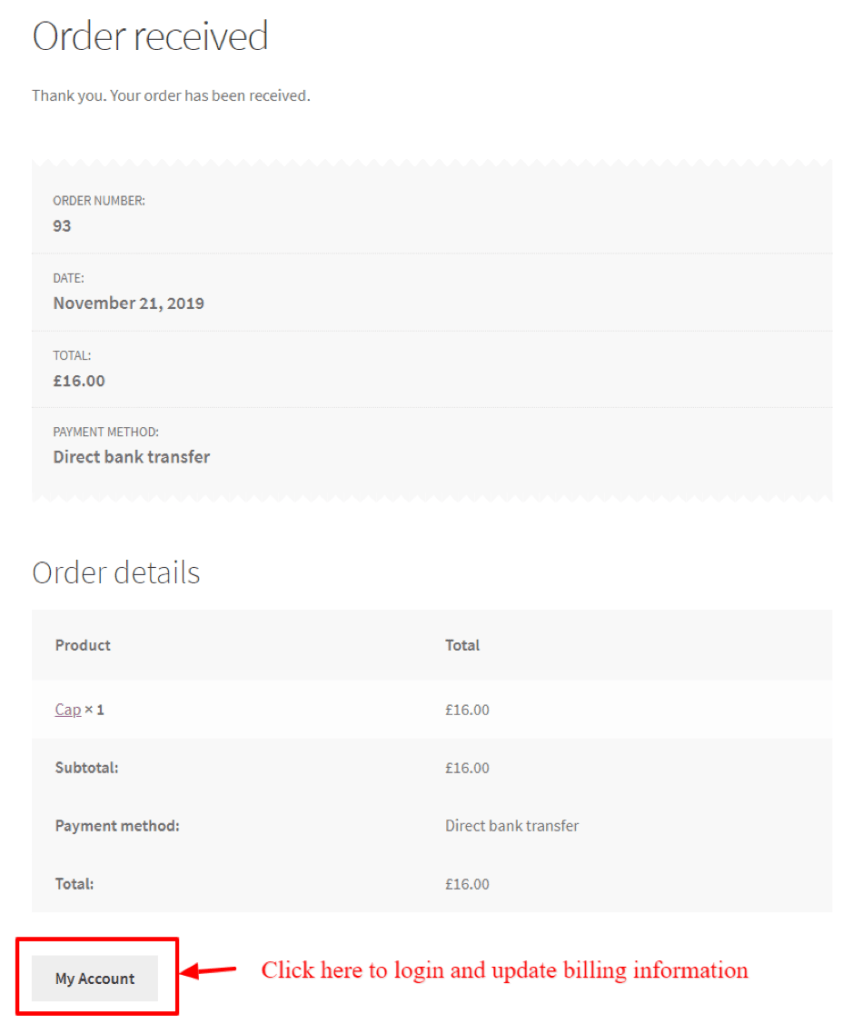
Using the plugin, you can enable Delayed Account Creation and send temporary login credentials to your buyers. This helps in making the payment and purchasing process easy for users who don’t have an account.
To do so, non-login users will have to click on the ‘My Account’ link and update their billing information. It’ll take them to an auto-generated account. Later on, they can complete the account creation process.
3. Reflect Your Brand in the Checkout Design
A branded checkout page builds trust and provides a cohesive shopping experience, which can lead to higher conversion rates. By integrating your brand’s colors, fonts, and logo, you can ensure that the checkout process aligns seamlessly with your overall brand identity.
Customize the Checkout Page: To customize the WooCommerce checkout page, use the WordPress Customizer or add custom CSS to match your brand’s aesthetics. Keep the design clean and uncluttered to minimize distractions.
For advanced features and template options, consider plugins like CheckoutWC for a Shopify-style cart or Checkout Field Editor for WooCommerce to rearrange the checkout layout.
Add Banners to Elevate Your Checkout Page with Dotstore
The WooCommerce Banner Management plugin from Dotstore allows users to add custom banners to their checkout pages. This functionality not only improves the visual appeal of your checkout process but also makes it more engaging by integrating promotional messages and offers.
Customization:
- Add promotional banners to highlight limited-time offers or special discounts.
- Customize banner placement on the checkout page for maximum visibility.
- Update banners for seasonal promotions or special offers to keep the content fresh.
“Truly a great plugin to have on the site. I just love it.”
Step-by-Step Guide
To enable banners on your checkout page, follow these steps:
- Install and activate the WooCommerce Banner Management plugin.
- Go to WooCommerce > Banner Management and select the Checkout Page tab.
- Click Add New Banner and upload your banner image.
- Customize the banner placement and set any promotional messages or offers.
- Save your changes and review your checkout page to ensure the banner appears as desired.
Other Methods to Enhance Your WooCommerce Checkout Process
Performance Optimization
Performance optimization is essential as it directly influences user experience, conversion rates, and overall business success. To boost your checkout process:
- Opt for a hosting solution optimized for WooCommerce, such as Bluehost, Nexcess, or Pressable, to ensure your site runs smoothly.
- Enhance your WordPress site by using Jetpack Boost, which generates local critical CSS, defers non-essential JavaScript, and enables lazy image loading to collectively accelerate your site and checkout process.
- Keep all plugins and extensions current to maintain compatibility and benefit from performance improvements.
Offer Diverse Payment Options
Offering a range of payment options caters to various customer preferences and can minimize cart abandonment:
- Keep shipping fees as low as possible. Extra costs were responsible for nearly half (48%) of consumer abandonment of carts in 2024.
- Include extensions for popular payment gateways like PayPal, Klarna, Stripe, and Apple Pay to accommodate different payment preferences.
- Clearly communicate the security of the payment process to reassure customers.
- For international customers, consider offering local payment methods via WooPayments to integrate methods like iDeal, P24, EPS, and Bancontact.
Ensure a Seamless Mobile Checkout Experience
With mobile commerce generating around $1.7 trillion in 2023—accounting for over half of all retail e-commerce sales, optimizing the mobile checkout experience is essential for boosting conversions.
- Ensure you have a responsive theme and that you optimize the checkout page for mobile devices. Make sure page load times are low.
- Use larger buttons and simplify form fields to enhance navigation and ease of use.
- Conduct frequent tests of the mobile checkout process to identify and address any issues promptly.
Start Optimizing Your WooCommerce Checkout Today
A streamlined, customized checkout process that not only simplifies transactions but also aligns with your brand, will make for a more engaging shopping experience. Optimizing your WooCommerce checkout is essential for reducing cart abandonment and boosting both customer satisfaction and sales.
WooCommerce Checkout for Digital Goods streamlines the checkout process by eliminating unnecessary fields for digital products, while WooCommerce Banner Management allows for easy customization and seamless integration.
Start optimizing your checkout process today with WooCommerce Checkout for Digital Goods and transform your eCommerce performance.
WooCommerce Checkout For Digital Goods
Quick checkout for faster sales and happier customers
14-day, no-questions-asked money-back guarantee.