Table of Contents
Helping customers find what they need quickly and easily is essential.
WooCommerce category filters are powerful tools for any eCommerce store to increase customer satisfaction. Filters improve the user experience by allowing customers to sort through products based on specific criteria. This leads to increased sales and lower bounce rates.
This comprehensive guide will cover various ways to set up category filters, including built-in WooCommerce options, plugins like WooCommerce Product Finder, and custom code solutions. We’ll also share best practices for organizing and displaying these filters effectively.
By the end of this article, you’ll have practical solutions to implement category filters in your WooCommerce store, ensuring a seamless shopping experience for your customers.
How Category Filters Improve User Experience and Increase Sales in WooCommerce
Research suggests that 69% of consumers head directly to the search bar when visiting an online retailer, but 80% of those surveyed admitted to leaving because they were dissatisfied with the on-site search experience.
Hence, even if your online catalog is extensive and impressive, customers may feel overwhelmed by the sheer volume of choices if they can’t quickly and easily find what they need.
This is where category filters come into play. These filters improve the user experience by helping customers navigate large product catalogs, find products swiftly, and reduce the complexity of product selection. This leads to increased customer satisfaction and lower bounce rates, as customers are more likely to stay on your site and explore products when they can filter results based on their preferences.
Furthermore, category filters can significantly boost sales. By simplifying the product search and selection process, filters increase the likelihood of customers making a purchase. Studies show that shoppers who use filter functions are almost twice as likely to make a purchase compared to those who don’t.
Your Options for Setting Up Category Filters in WooCommerce
Simple: WooCommerce’s Built-in Category Filtering
WooCommerce offers a straightforward solution for adding category filters to your shop page through its built-in category filter widget. This widget enables customers to filter products by category, providing a simple and effective way to improve navigation on your online store.
The built-in category filter widget can be customized to display categories in various styles such as list, inline, dropdown, or select. This flexibility allows you to choose the display option that best aligns with your store’s design and layout.
Here’s a brief overview of how to set up a category filter using the built-in widget:
- Access the Widget Settings:
- Go to your WordPress dashboard.
- Navigate to Appearance > Widgets.
- Locate the “Product Categories” widget.
- Add the Widget to Your Shop Page:
- Drag and drop the “Product Categories” widget into your desired widget area, such as the sidebar or footer.
- Customize the Widget:
- Select the display style (list, dropdown, etc.).
- Choose whether to show product counts, hierarchy, and empty categories.
- Save Your Changes:
- Click the “Save” button to apply your settings.
This method is simple and requires no additional plugins or coding knowledge, making it an excellent option for beginners or those with smaller stores. However, it does have its limitations. The basic filtering options provided by WooCommerce’s built-in widget may not meet the needs of all online stores due to:
- Limited Filter Criteria: Many stores require more advanced filtering options beyond just categories, such as filtering by price, attributes, or custom tags.
- Lack of Customization: Store owners often need to customize filters to match the unique design and functionality of their website. The default filters may not offer the flexibility required for such customizations.
- Lack of Visual Enhancements: The built-in filters generally lack visually appealing or engaging features that can enhance the user experience.
Custom: Category Filters with Powerful Plugins
For store owners seeking more advanced and customizable category filtering options, using WooCommerce plugins is an excellent approach.
Plugins such as WooCommerce Product Finder, JetSmartFilters, HUSKY (formerly WOOF), AJAX Product Filters, and Super WooCommerce Product Filter offer a range of powerful features to enhance the filtering experience on your WooCommerce store.
The primary benefit of using these plugins is the increased flexibility and customization they provide. With these tools, one can create dynamic, personalized filters that go beyond the basic category filtering available in WooCommerce’s built-in options. This can significantly improve user experience by making it easier for customers to find exactly what they’re looking for, thereby reducing bounce rates and increasing sales.
However, it’s important to note that using these plugins may come with a brief learning curve. There could also be potential compatibility issues with other plugins or themes. Thankfully, most of these plugins come with comprehensive documentation and support to help users navigate any challenges they may encounter.
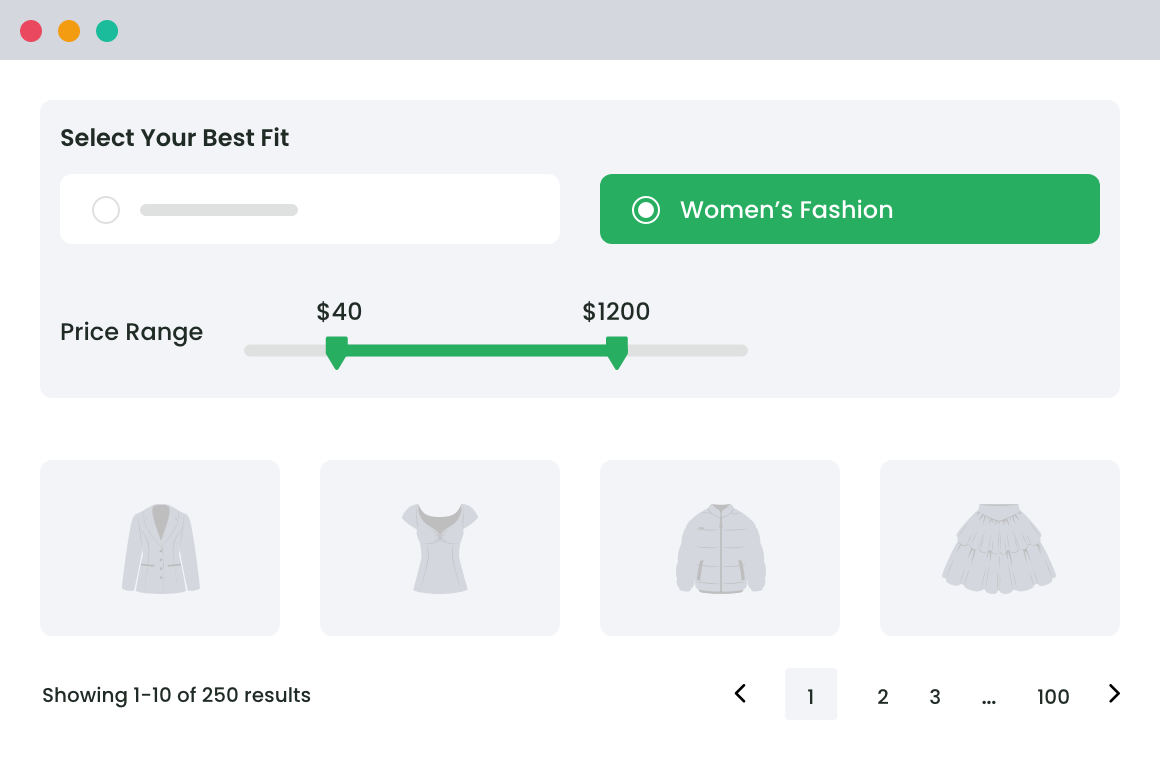
Among these options, the WooCommerce Product Finder stands out as a particularly powerful tool. It offers several features that enable the creation of dynamic, personalized filters, significantly enhancing user experience and boosting sales. Here’s an analysis of its key features:
1. Create Dynamic Questionnaires: The plugin allows you to create questions with various options, such as radio buttons or checkboxes. These questionnaires can be displayed on product pages to gather detailed information about customer preferences and interests.
2. Create Wizards Based on Specific Brands/Categories: Creating wizards involves adding a title, selecting a category, and including relevant questions. These wizards, which can be embedded on any page, guide customers through a structured, step-by-step search process.
- Tailored recommendations based on customer inputs ensure visitors feel understood and valued, while dynamic questionnaires and wizards simplify the search process, making it more intuitive and less time-consuming.
- Interactive features like adaptive questions keep users engaged, reducing bounce rates and increasing site time.
- Personalized product suggestions align closely with customer needs, leading to higher conversion rates.
- Showing relevant products also encourages customers to add more items to their cart, increasing average order value. A positive, personalized shopping experience fosters repeat visits and long-term customer loyalty.
Using the WooCommerce Product Finder reduces search time and allows for quickly presenting relevant products. It’s also friendly and fun, and this personalized approach enhances user experience and boosts sales, providing a tailored shopping experience that drives higher engagement and conversion rates.
According to a 2022 study on eCommerce filter and search functionalities, 80% of online buyers are more likely to purchase your products if you offer a personalized experience (eCommerce Filter & Search).
Product Finder For WooCommerce
Help your buyers make purchase decisions faster with our detailed product finding plugin.
14-day, no-questions-asked money-back guarantee.
Advanced: Category Filters Using Code Snippets
For advanced users seeking maximum customization, creating custom category filters using code snippets offers unparalleled flexibility. This method allows you to tailor filters precisely to your store’s unique needs and design requirements. However, it requires a solid understanding of coding, making it less suitable for beginners or those without technical expertise.
To create a category filter using code snippets, you typically need to modify your theme’s functions.php file or create a custom plugin. This involves writing PHP and possibly JavaScript to query and display products based on selected categories or attributes.
It’s crucial to note that implementing filters via code snippets can be time-consuming and carries risks of errors if not done correctly. Always back up your website before making any changes to your code to prevent potential disruptions to your store’s functionality.
Advanced users who are comfortable with coding can achieve highly tailored filtering solutions that seamlessly integrate with their WooCommerce stores, enhancing both user experience and backend efficiency.
Step-by-Step Guide to Adding Category Filters Using WooCommerce Product Finder
When it comes to implementing customizable category filters in WooCommerce, using a plugin like WooCommerce Product Finder is the simplest and most effective solution, even for users without technical expertise. This plugin streamlines the process and saves valuable time and effort.
You can follow this documentation and live demo to set up category filters seamlessly. We have mentioned the basic steps here:
1. Creating a New Filter:
Begin by installing and activating the WooCommerce Product Finder plugin. Navigate to the plugin’s settings in your WordPress dashboard and select “Add New Filter.” Choose “Category” as the filter type and proceed to select the specific product categories you want to include in your filter. Customize the appearance and behavior of the filter according to your preferences, such as displaying categories in a dropdown or checkbox format.
2. Adding the Filter to the Page:
Once you’ve configured the filter settings, save your changes. To add the filter to your product page or any other page on your site, navigate to the page editor. Look for the “Add Product Finder Filter” button above the editor. Clicking this button will insert a shortcode that displays your configured category filter on the page.
3. Customization and Optimization:
Explore additional customization options within the WooCommerce Product Finder plugin settings. Customize colors, fonts, and layout to seamlessly integrate the filter with your site’s design. Optimize filter performance by adjusting settings for speed and responsiveness to ensure a smooth user experience.
4. Testing:
After adding the filter to your site, thoroughly test its functionality. Ensure that selecting different categories correctly filters products displayed on the page. Test across different devices and browsers to confirm compatibility and responsiveness.
5. Troubleshooting:
In case of issues, refer to the plugin’s documentation for troubleshooting tips. Common issues may include conflicts with other plugins or themes, which can sometimes affect the filter’s performance. Ensure all plugins and themes are updated to their latest versions to minimize compatibility issues.
By following these steps, you can successfully implement and customize category filters using the WooCommerce Product Finder plugin. This user-friendly approach not only enhances navigation for your customers but also contributes to improved sales and overall user satisfaction on your WooCommerce store.
Best Practices for Organizing and Displaying Category Filters
When setting up category filters on your WooCommerce store, follow these best practices to optimize user experience and maximize usability:
1. Filter Prominence: Place filters prominently on the page in a consistent and visible location. Use clear, descriptive labels for each filter category to guide users effectively through product navigation.
2. Minimalist Design: Opt for a minimalist design for your filter interface. Avoid clutter by presenting only essential filter options at a time. This approach prevents overwhelming users and helps them focus on relevant choices.
3. Mobile Optimization: Ensure your category filters are fully responsive and mobile-friendly. Mobile users should experience the same ease of use as desktop users, facilitating a seamless shopping experience across all devices.
4. Customization: Integrate the design of your category filters with the overall aesthetics of your website. Maintain brand consistency and visual coherence to enhance user trust and satisfaction.
5. Logical Organization: Organize filters in a logical hierarchy to facilitate intuitive navigation. Start with main categories at the top, followed by subcategories and specific attributes. This structure guides users through progressively detailed filtering options.
6. Filtering Options: Provide a clear and logical category structure for filtering options. Categories should reflect primary product types such as ‘Sofas’, ‘Chairs’, or ‘Tables’, making it easy for customers to locate desired items quickly.
7. Categorize as needed for your shop: Organizing your products with a logical category structure offers several advantages for effective filtering and improved user experience:
- Categorize by product type: Instead of creating categories based on secondary characteristics like color, material, or size, use attributes within each category.
- Use attributes for characteristics: Attributes allow customers to filter products further based on specific features, enhancing customization and relevance.
- Keep the Category Structure Simple: Maintain a straightforward, hierarchical category structure. Avoid excessive nesting or subcategories that could overwhelm users.
By implementing these best practices, you can optimize your WooCommerce category filters to enhance user satisfaction, streamline product discovery, and ultimately boost conversion rates on your online store.
Maximize Your WooCommerce Store’s Potential with Optimized Category Filters
Implementing effective category filters enhances product discovery, reduces choice paralysis, and helps customers find relevant items, thereby boosting satisfaction and enhancing site usability.
This is where WooCommerce Product Finder takes the cake – it is suitable for businesses of all sizes, enhances filtering capabilities with ease, and helps boost their WooCommerce store. With extensive documentation, dedicated support, and a 14-day money-back guarantee, getting started is seamless.
Don’t sit back and wait. Check out WooCommerce Product Finder today and empower your WooCommerce store for unparalleled sales and customer satisfaction.
Product Finder For WooCommerce
Help your buyers make purchase decisions faster with our detailed product finding plugin.
14-day, no-questions-asked money-back guarantee.