Table of Contents
So, you have created a WordPress website and are now looking to add more features to it, right? That’s probably why you are here as there isn’t any better way to add features to a WordPress site than a plugin.
As a matter of fact, WordPress has thousands of plugins designed to help you optimize the overall functioning of the website. Whether you want to add a form, create an eCommerce store, integrate a payment portal, or track site performance, WordPress has a plugin for all.
In case you are wondering how to use a plugin in WordPress, let me help you out. This guide is designed to uncover different ways to install a WordPress plugin. Even if you are new and have no idea as to where & how you can find a plugin, hold on. We will detail you on every step.
How to Install a WordPress Plugin?
Just before you move ahead with the process, make sure you have your website opened right in front of you. It’s always better to do things simultaneously.
Note: You will not find plugins if you have a WordPress.com site. Plugins are a WordPress feature found only in the self-hosted org site.
Now that you are all set to move ahead, let’s start our process:
1. Install A Plugin Through The Dashboard — Search Bar
The first and simplest way to download and install a WordPress plugin is through the search bar, part of the admin panel.

However, you need to be aware of the fact that only those plugins that are available for free will be returned in the search query. If you enter a plugin that isn’t available for free, the search bar will not have the plugin displayed.
Considering that the plugin you are looking for is righteously present in the WordPress directory of free plugins, let’s see how to install it on the website.
- To begin with, you first need to log in to the admin panel. Enter the username and the password to log in to the WordPress dashboard.
- Now, move to the left of the screen and then click on plugins.
- Once you have clicked, just below, you will see a button that says Add New; click on it.
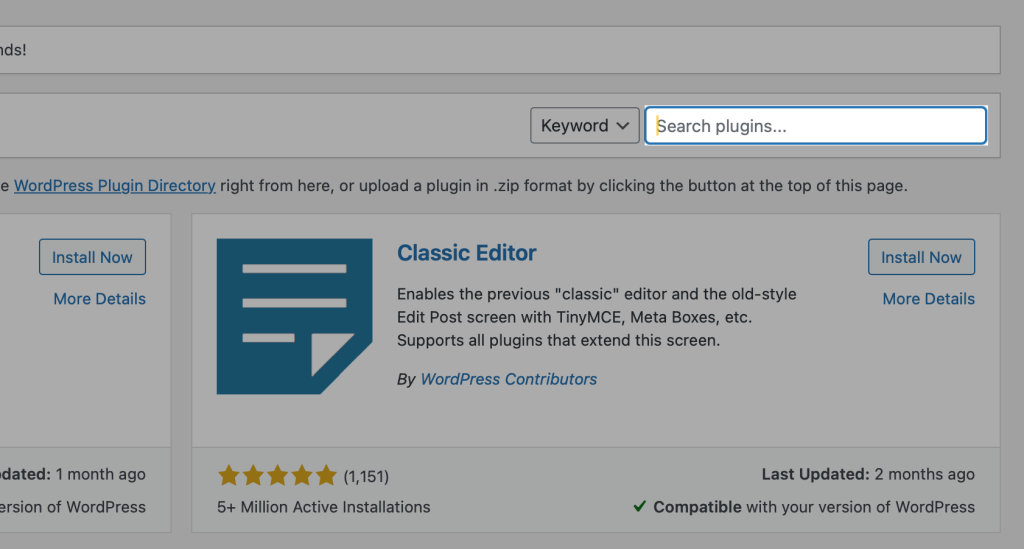
- On the next page, to the right of the screen, you will have a search bar.
- Here, you need to look for the plugin. You can either type in the name of the plugin or, if you don’t have the name, search for the feature you want to add and click on go.
- The next page will have a list of plugins that map the needed features.
- You can go through them and select the one that serves your purpose best. Once done, click on the install now.
- The plugin will be downloaded, and then you will see a message on the screen that says download complete.
So are we done?
Did I forget that you need to activate the plugin to get started? So, go back and activate your plugin.
Once done, you are now all set to use the plugin
2. Using The Admin Upload Option
Wondering why would you need this?
If you remember, there was a limitation concerning downloading a plugin using the search bar. It restricted you to downloading only the free plugins. So does this mean that you cannot download the paid ones?
Of course, you can, and that’s where we use the upload feature of WordPress. The upload button that you will see in the WordPress admin area allows you to add paid plugins to the website and use them on the go.

The first thing you need to do is download the plugin or the zip file. Next, follow the steps given below:
- To get started, visit the admin dashboard by logging in with the desired credentials
- Now, click on plugins and then add new ones.
- On the top left corner, you will see a button that says upload.
- Once you click on the button, a new page opens up. You must upload the file from the external directory or your local computer. Click on Choose File, and then select Install Now.
- After you finish the above, WordPress will do the task and install the plugin.
- Once again, we will have a success message displayed. Don’t forget to click on activate my plugin button.
- Left is the configuration process you can do as needed so we are done installing and uploading the paid plugin.
3. Install a WordPress Plugin Through FTP
You are restricted from uploading plugins using the admin dashboard in certain situations. There isn’t any definition as to why does WordPress denies you to upload plugins directly.
So what do you need to do here?
Don’t worry!
WordPress has an alternative here also. The FTP login is an effective way to upload and install plugins. Though, it isn’t friendly yet will help you to install the plugin.
- To start, make sure you have the zip file of the plugin downloaded and stored in the local storage.
- Next, extract the file and save it in a new folder.
- Open the FTP manager and then log in to the hosting account. In case you don’t have the username and password to log in to the FTP. You can connect with the host and get hold of the same.
- Now access the path as: /wp-content/plugins/
- After that, you must upload the extracted folder to the /wp-content/plugins/ folder on the web server.
- Once you have uploaded, you now need to
activate the plugin. To do so:
- Move to the WordPress admin area
- Now, click on plugins
- A new page opens that will show all of the installed plugins.
- Click on activate to get started with the plugin.
With this, we come to the end of the plugin installation process.
How do you Install a WordPress plugin from Dotstore?
Until now, we have been focusing on the WordPress dashboard to download and install the plugin. However, multiple famous plugin sellers, like DotStore, sell their WooCommerce and WordPress plugins through their websites or WP marketplaces.
Here, we will see how to install a WordPress plugin from the dotstore. Without rummaging much, let’s move ahead to see how we can do the above.
Now, the reason why we are focusing on the dotstore process is the fact that the Page Visit Counter for the WordPress PRO plugin follows a different setup to download and install the plugin. As a matter of fact, the procedure isn’t the same as compared to the one that you would have followed while integrating the free plugin.
- First, you would need to click open the PRO plugin page. You can visit this link.
- Since we are in the premium version, you must select the subscription type along with the kids of license you want to purchase. Whether it is for a lifetime or renewed annually and if it’s for a single site or more than 5.
- Once you have selected, you can move ahead by clicking the ‘buy now’ button.
- After you click, you will see a new page opens up. Here, you are expected to add all of the desired details. Starting with the payment-related information to your details. If you have a promo code that offers you a certain discount, you can apply that and then click on the review order to move ahead.
- After you have reviewed the details, make sure you verify the same to check whether or not they are accurate. Once done, you can click next to complete the purchase process.
- Once the payment has been made successfully, you will get a link that you can use to download the plugin and sign up for the DotStore.
- The email that you receive will have all of the information related to the installation process. You can follow them to move ahead. Also, you can now download the PRO version of Page Visit Counter by adhering to the given steps.
- After the download process, you can now live ahead to install the plugin. Follow the same process as the one you undertook while installing the free version.
- After successfully installing the plugin, you will be asked to enter a key for activating the plugin. To get hold of the same, visit your account in DotStore, trace the key, and copy it.
- Now move to the WordPress dashboard and paste the key in the box asking for it. Now, you are all set to get started with the plugin.
Final Words!
Given above were four different ways to download, install and activate a plugin in WordPress. Based on your requirements, you can now pick one of the above and install the plugin on your WordPress website.
